

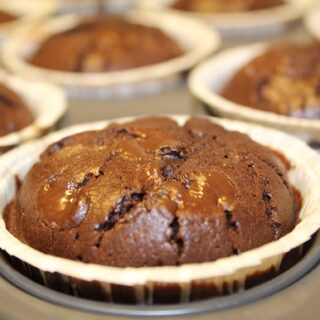
Getting cupcakes to bake perfectly can be incredibly tough. One of the most common issues many bakers face is cracked tops.
Even if you followed every single recipe step as carefully as possible, sometimes, your cupcakes will still crack! But why do cupcakes actually crack on top?
The most common cause for cracked cupcakes is a too high oven temperature, which will make the cupcakes rise too quickly and hence crack on top. Adding too much baking powder will make them rise even faster.
Read on if you want to know why your cupcakes crack and how you can prevent them from doing so!
What Causes Cupcakes to Crack on Top While Baking?


In baking, even minor things can cause big problems and give you major headaches.
Cracked cupcakes (or muffins, for that matter) are not the end of the world, but if your objective was to bake the perfectly smooth and even cupcake, it’s just not something you’ll want to end up with!
And if you know the causes, it’s much easier to avoid this problem.
So without further ado, here are the most common reasons why your cupcakes will crack while baking:
The oven is too hot
The oven’s temperature is critical for baking perfect cupcakes. If the oven is too hot, the surface of the cupcake will bake much faster than the batter inside.
The crust will form faster than it should and will continue to bake faster than the rest of the cupcake.
This will lead to cracked tops and sometimes a dry surface area.
To prevent the outer layer from cooking too fast, the easiest solution is to lower the temperature of your oven a bit.
But what if you’re following the recipe strictly, and your cupcakes are still cracked on top when it comes out of the oven?
Not all ovens are created equal! The fact is that some models will get hotter or heat up slower or faster than other ovens.
If your oven gets hotter than the temperature you set, simply lower the temperature somewhat next time you’re making cupcakes.
A good-quality oven thermometer can really help in this regard!
This tool will help you to get a more accurate reading of your oven’s temperature, so you can rest assured the cupcakes are baking at the correct temperature.
PRO TIP: You can find a reliable and cost-effective oven thermometer on Amazon here!
You used too much baking powder
If there’s too much raising agent in your cupcake mix, naturally, your batter will rise too much and quickly.
Especially in combination with a too-high oven temperature, this can often produce huge cracks.
Additionally, the batter might spill over and cause unevenly shaped cupcakes.
Try to adjust the amount of baking powder in your mix until you find the perfect balance that’ll result in cupcakes with smooth and even tops.
The cupcakes aren’t in the right spot
Sometimes the temperature is correct, but the cupcakes are still cracking. This may be because the cupcakes are not placed where they should be in your oven.
It may sound strange, but the heating distribution of an oven is very often not at all even!
Depending on what baked goods you’re making, you should bake them in different parts of the oven.
Placing your cupcakes wrongly could cause them to bake unevenly.
Put them too high, and the tops will most likely crack or even get burnt.
Placing them too low might cause their bottoms to get burnt and their tops to be undercooked.
The best place for your cupcakes is usually in the center of the oven so that each part of the cupcake receives the same amount of heat and can bake evenly.
The wrong baking pan was used


While most cupcake and muffin pans look similar, they can be slight but important differences between them!
The biggest is undoubtedly the size of the cupcake tins. If a recipe asks for a specific cupcake tin size, then always use that size.
If your pan is too big or too small, it could lead to uneven cooking and cracked tops.
Baking recipes are usually scaled for specific baking pan sizes, so try to find a recipe that matches the cupcake tins you have at home.
Alternatively, you can try scaling the recipe to fit your baking pan.
Can You Still Use Cupcakes That Have Cracked on Top?
As long as the cupcakes are fully baked, then cracked cupcakes are safe to eat. They may be a bit dry on top, but they won’t be inedible.
Also, cupcakes with cracked tops may not be as pretty, but rest assured that they will be as yummy!
One positive thing about a cupcake that is cracked on top is that it is an easy mistake to hide.
All you have to do is to cover the crack with an extra hefty layer of frosting and some added decorations, and no one will ever notice those cracks underneath!
I mean, you’ll add those toppings anyways, right!?
And who really checks the top of the actual cupcake before eating it? That’s right: no one!
So don’t freak out if you end up with those cracked cupcake tops! Compared to other things that can go south in the kitchen, this is nothing more than a minor issue.
What Is the Optimal Temperature for Baking Cupcakes?

Cupcakes will bake best at temperatures between 325F and 375F. It’s best to follow the temperature your specific recipe calls for, but generally speaking, that’s the range you’re looking at.
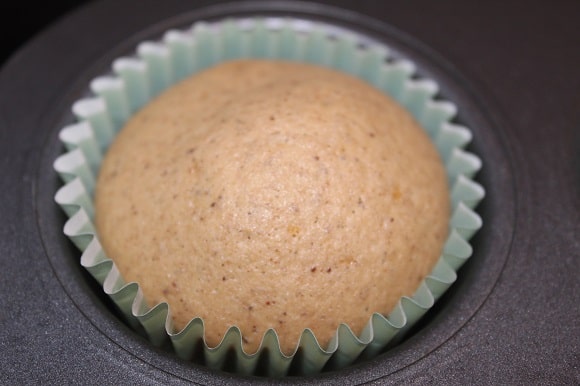
Now, if you want cupcakes with a flat top, it’s best to bake them at around 325F.
Flat cupcakes should be baked low and slow to get the best shape. Just don’t undercook them!
If you want to make dome-shaped cupcakes, start baking them at 350F.
If your cupcakes aren’t rising as much as they should or not baking fully, increase the oven temperature to around 375F.
It’s best not to go higher than 375F. Oh, and keep an eye on your cupcakes and the timer, as they can get burnt really fast toward the end there!
What Are the Best Cupcake Liners?
There are many different types of cupcake liners out there, so the best cupcake liner for you may differ from the best for someone else.
I usually test a few brands and types and then go for the one I am most satisfied with.
Here are some liners I use and can highly recommend. They fit different needs, are all decently priced, and can ve found on Amazon:
With standard white cupcake liners, make sure to buy greaseproof ones made from high-quality, food-grade paper.
This will prevent any smells from going into the cupcakes and keep them sturdy. Caperci’s standard liners are a great example of a high-quality cupcake liner.
Some standard liners can sometimes get stuck to the cake while baking, which is something you should look out for! (Caperci’s don’t, which is why I recommend them)
You may not know this, but most standard cupcake liners are bleached.
Though they are safe to use, some bakers feel more comfortable using unbleached cupcake liners.
Outside of their unbleached quality, these cupcake liners work the same way as standard cupcake liners.
One awesome thing about silicone liners is that they are reusable.
Rather than having to buy single-use liners all the time, just get yourself a packet of silicone liners, and you’re good for a very long time!
The environment will thank you for that choice as well.
They work like regular cupcake liners, but with one caveat; most silicone liners need to be greased before being filled to prevent sticking.
Happy baking!
Related Recipes

Delicious Chocolate Cupcakes
Those cupcakes are perfect as a base for any frosting of your choice. Using buttermilk will make your cupcake bases lighter and fluffier than muffin bases, which I prefer when baking cupcakes.
Ingredients
- 2 cups flour
- 1 ½ cups sugar
- 1 tsp baking soda
- 1 tsp baking powder
- 1 tsp salt
- ¾ cup unsweetened cocoa powder
- 2 large eggs
- 1 cup buttermilk
- ½ cup of oil
- 2 tsp vanilla
- 1 cup boiling water
Instructions
- Mix the sugar with boiling water to dilute it
- Add the wet ingredients to the sugar
- Sift and mix the remaining dry ingredients together
- Mix the dry and wet ingredients together, but don't overmix them
- Bake in the oven at 340F/170C for 20 minutes
Notes
- You can use any type of sugar for this recipe as you dilute the sugar in the boiling water
- If you want to use raw sugar, demerara sugar or turbinado sugar are good alternatives
- Muscovado sugar is also a great alternative to granulated sugar
Nutrition Information:
Yield: 30 Serving Size: 1Amount Per Serving: Calories: 119Total Fat: 4gSaturated Fat: 0gTrans Fat: 0gUnsaturated Fat: 4gCholesterol: 13mgSodium: 157mgCarbohydrates: 18gFiber: 1gSugar: 10gProtein: 2g
Leave a comment